Git Essentials: Beyond the Basics

Beyond The Basics and A Little Deeper
I went to a Web Development Bootcamp called Fullstack Academy in NYC, where part of the curriculum was of course to learn Git. I worked on teams there and therefore already knew how to stage changes, commit, branch, merge, deal with merge conflicts and so on. However, I didn’t necessarily learn why and how those things worked, as well as other useful things like rebasing and stashing.
So I took a popular Git Masterclass on udemy (https://www.udemy.com/git-basic-concept-fundamentals-github/learn/v4/overview). The first half of the 12 hour course was mostly review of the basics I already knew, which I’m not going to go into here. But the second half got into some useful and pretty rad stuff! So this post is about what I learned from that course that I found most useful and want to remember.
Note that this is approximately 5 hours of video lecture material, plus my own research. It’s a lot. So I encourage you to skip around to the sections you would like to know more about.
Here’s the outline:
Some terminology explanation and pager config
Git Stash
Git Rebase
Git Merge
Git Log
Git Reflog
Git Checkout
Git Branch
Git Fetch
Git Reset
Some Other Git Stuff
1. Terminology and Pager Configuration
First, some terminology for you as you’re searching around for answers to Git questions and a little bit about Pagers.
Index Area and Staging Area synonymous.
Directory and Folder are synonymous.
The Commit Area is where all artifacts are stacked safely in the Git database. An artifact is any file or directory that is in your git project directory, which is the directory that your .git directory is in.
A Pager is a command line program that’s used to view and not modify a text file. By default the pager for git is less. more is also an option, but apparently less is more advanced.
Both of them make you enter the pager program and view the file from there instead of just outputting the contents of the file. Which means that when you are done looking at it and exit with q command, the file’s output goes away. I wanted to be able to look at it and reference it while I was typing my next commands. So I made cat the default pager so that the contents of the file would just be printed in the terminal and I could scroll up to see it.
Note: I did recently find a tutorial from egghead.io on using ‘less’, which might make me want to switch back. https://egghead.io/lessons/tools-practical-git-navigate-git-command-pager-output-with-unix-less-commands
This is the command I used for setting ‘cat’ to be my default pager:
git config --global core.pager cat
To see your custom git config settings use this command:
git config --global --list
That outputs the contents of your global .gitconfig file, which lives in your user home directory. It only contains modifications you’ve made to the default settings. It does not show all git settings. So if you wanted to go back to complete defaults, one way you could do this would be to delete the contents of this file.
This is what mine looks like at the moment:
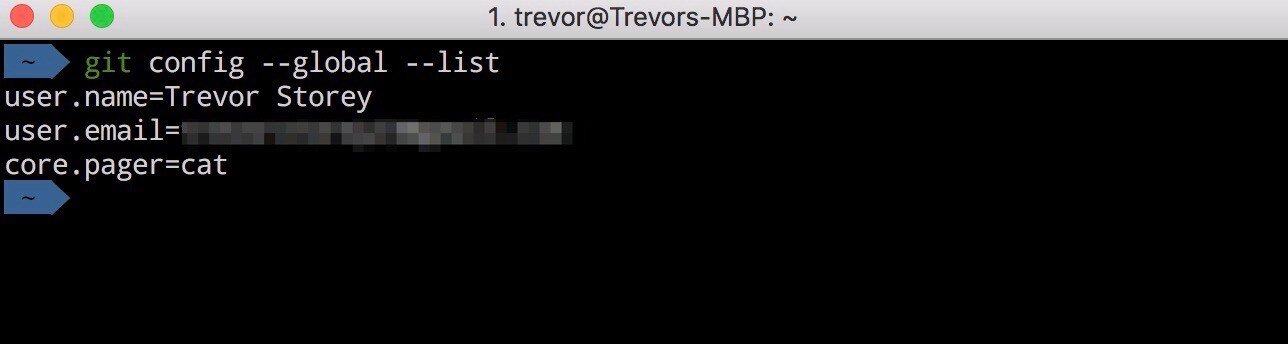
.gitconfig file contents
Detached Head State:

Example of Detached HEAD state
Any edits/changes/commits you perform in this state aren’t added to any branch, nor do they modify any branch. It’s all temporary. It is completely discarded when you checkout(switch to) a different branch or commit.
If you want to save the temporary changes you’ve made in this state, you can create a new branch with
git checkout -b <new_branch_name>. Your previous branch will remain how it was before you entered the Detached HEAD state and made the temporary edits and your new branch will have all of the changes you made during the Detached HEAD state.
2. Git Stash
Like a temporary commit. It saves the working directory and Index/Staging Area state.
Use Cases:
When you have unfinished changes you don’t want to lose or commit, but you need to checkout another branch or other git object.
If you made changes on the master branch(or some other branch you didn’t mean to) that you meant to put on a new feature branch. Stash is great!
git stash
First, this creates a stash of the changes since the last commit, or the next most recent stash if you have another one.
Second, it returns your Working Directory to what it was before the stashed changes were made.
NOTE: Only tracked files are stashed by default. So if you have a brand new file that hasn’t ever been added to the staging area, that file will not be stashed.
git stash -u
Like git stash except it includes untracked files.
git stash --keep-index
Stashes changes in Working Directory, but does NOT stash changes in Index/Staging Area.
Returns Working Directory to what it was before the stashed changes were made, but leaves the Index/Staging area untouched.
git stash save “<stash_message>”
Same as
git stash, but with a message. Similar to a commit message.
git stash list
Shows existing stashes in the repository. Not just the ones associated with the currently checked out branch.
git stash show stash@{<n>}
Shows some details about the specified stash.
git stash apply
Loads the Working Directory stashed changes from latest stash into Working Directory. Does not include stashed files that were in the Index/Staging Area.
git stash apply <stash_ID>
Loads the Working Directory stashed changes from specified stash into Working Directory. Does not include stashed files that were in the index/staging area.
git stash apply --index
Loads the Working Directory AND Index/Staging Area stashed changes from specified stash into Working Directory and Index/Staging Area.
git stash drop
Deletes most recent stash
git stash drop <stash_ID>
Deletes specified stash
git stash pop
Loads most recent stashed changes AND deletes that stash reference.
git stash pop <stash_ID>
Loads specified stashed changes AND deletes that stash reference.
git stash clear
Deletes all stashes
git stash branch <new_branch_name>
Creates and switches to <new_branch_name>
Loads all stashed changes from most recent stash into the new branch.
Deletes(drops) that stash
Use Case: If you made changes on the master branch that you meant to put on a new feature branch.
3. Git Rebase
The primary reason for rebasing is to maintain a linear project history. It rewrites the commit history of the branch being rebased. Typically a feature branch. This is better than merging master into your feature branch every time there is a change to master.
When you rebase, it’s not technically merging anything. It essentially picks up all the commits on the feature branch and moves them to start right after master branch HEAD. As if you had branched off of the current and most recent master branch commit and made all your commits on your feature branch from there. If the goal is to merge, then you will merge after the rebasing has completed.
A typical time to rebase is when more commits have been added to the master branch since you created your feature branch from it, and you want to get those changes into your feature branch while you continue working on it.
First make sure you are on the feature branch that you want to move then run this command:
git pull --rebase origin master
This will place your local feature branch commits on top of the latest commit in the origin remote repo’s master branch. Without creating a Merge Commit.
If you have rebasing conflicts, you’ll need to run the command git mergetool. You’ll enter your text editor, fix the conflicts there, save, quit your editor, and then run git status. If you resolved everything it should say something to the effect of ‘rebase in progress…all conflicts fixed’. If so, then run git rebase --continue. And it will finish.
Note: Once you run a ‘git rebase <BASE>’ command, no commits are necessary as you’re fixing conflicts, nor right after. Git will connect the commits automatically.
Note: The “moved” commits will have new Commit IDs. So it’s essentially deleting them and then creating new ones. Which is why you should not rebase commits that exist outside your local repository. If you are the only one working on a feature branch, then that’s fine, but if someone else is working on the same feature branch and you rebase some of those commits, that will cause problems… for more info on this: https://git-scm.com/book/en/v2/Git-Branching-Rebasing#The-Perils-of-Rebasing
4. Git Merge
A note about Merge Commits: Merge’s that result in a Merge Commit should really only be performed when you have significant changes, like a completed feature or new version of the app. If you need to pull small changes from master into your feature branch, rather than clutter your local git history with another Merge Commit, do a pull with rebase option like this(explanation in the Git Rebase section):
git pull --rebase origin master
There are 3 different ways to merge branches:
Fast Forward Merge
No Fast Forward Merge
3-Way Merge, AKA Automatic Merge
Fast Forward Merge
git merge <branch_name>Merges <branch_name> into currently checked out branch.
Does NOT make a Merge Commit unless there are merge conflicts, in which case your merge automatically becomes a 3-Way/Automatic Merge
No Fast Forward Merge
git merge <branch_name> --no-ffThis is an alternative to Fast Forward Merge if you know you won’t have merge conflicts but you still want to create a Merge Commit.
Preserves a reference to that branch with the commits made to that branch. When you delete the branch, the commits will retain references to that branch.
3-Way Merge, also known as, Automatic Merge
There’s no special command for this. It automatically happens when your master branch has gained more commits since your current feature branch was branched from it.
It’s called a 3-Way Merge because 3 commits are being merged. The most recent commit from feature branch, most recent commit from master branch AND the commit from the master branch that the feature branch was created from.
Use this command if you know you are going to have a Merge Commit to avoid opening an editor to write the Merge Commit message:
git merge <branch_name> -m “<Merge_Commit_Msg>”
Note: .orig files are auto-generated by git after you resolve merge conflicts. A .orig file is the file as it was before the merge conflict resolution.
5. Git Log
git log --oneline --graph --all
git log outputs info about the commit history in current git project.
--onelinemakes it output only one line for each commit. Less info, more readable.--graphincludes a text-based graph of branches and merge history along with the commits. cool :)--allincludes commits from unmerged branches. Otherwise, you’ll only see commits for the currently checked out branch.One use case is after you merge, you can run this, and if your feature branch and master branch are pointing to the same commit, then you know you can safely delete the feature branch.
git log --oneline --grep=“<text_to_search_for_in_commit_messages>”
This will search for and display all commits that have the specified text in the commit message.
git log --oneline origin/master
This command will show you the commit log for the local copy of the remote called origin, master branch.
6. Git reflog
The reflog is essentially a chronological history of everything you have done in your local repo, recording almost every change you make there.
It’s a log of where your HEAD and branch references have been for the last few months. A reflog reference is made anytime the HEAD changes. e.g. checkout a different branch, pulling in new changes, rewriting history, any new commit, etc.
Note: Reflog is strictly local. The references won’t be the same as someone else’s copy of the repo. When you clone a repo, your reflog will be empty. Because no activity has occurred yet in your local repo.
git reflog
Displays every time HEAD has changed locally.
git show <reflog_reference>
Displays a bunch of info about that particular reflog entry
Note:
git show HEAD@{0}andgit log -p -1will print the same output to the screen.A <reflog_reference> can be a number of things…
Examples of reflog references:
HEAD@{<n>}where<n>is the number you are referencing from reflog.HEAD@{1.minute.ago}You can also filter by timeframe with things like 1.minute.ago, 1.hour.ago, 1.day.ago, yesterday, 1.week.ago, 1.month.ago, 2011–05–17.09:00:00, 2.weeks.ago. You can combine them too. 1.day.2.hours.ago.Using reflog references and the ‘git diff’ command you can see the differences between current HEAD and a reflog reference. Like this:
git diff @{1.hour.ago}
This compares the current branch right now to the current branch 1 hour ago.
git show <branch_name>@{1.day.ago}
Shows the reflog entry closest to 1 day ago. Which displays the nearest commit to that time, what files and lines were changed, including the lines themselves. Green are added lines, red are deleted lines.
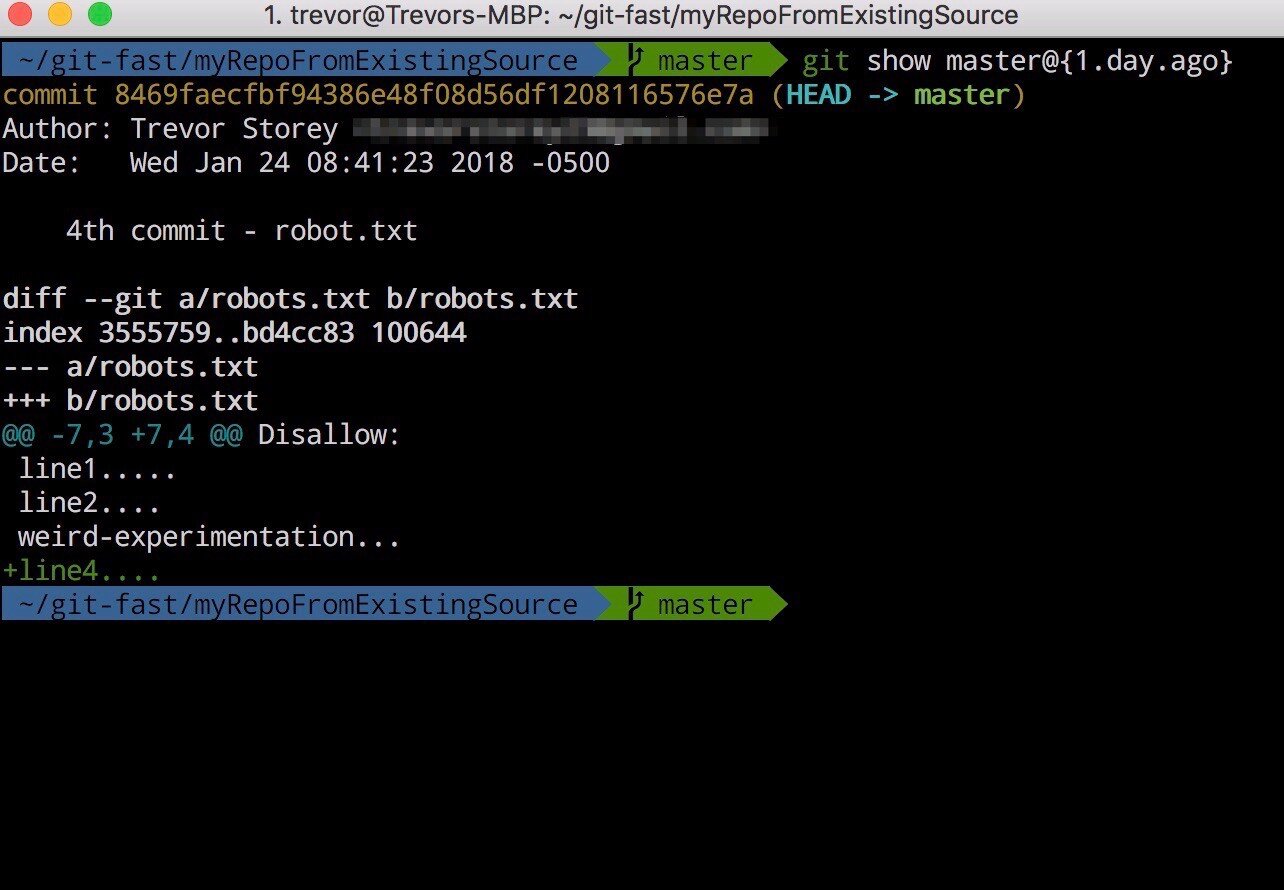
viewing a reflog reference
You can use reflog references with checkout as well.
git checkout <reflog_reference>
Puts you in a Detached HEAD state at the specified reflog reference.
Use case: if you did a
git reset --hard <commit_id>or something like that, you can still get back to where you were before you ran that reset if you want to undo it. Just checkout the nearest reflog reference to before you ran the reset command, then create a new branch from there.
7. Git Checkout
git checkout <commit_id>
Loads the entire project as it was at the specified commit_id. Also placing you in a “Detached Head” state.
git checkout <commit_id> <file_name>
Loads the specified file as it was at the specified <commit_id> into the project and adds that reverted file to the index/staging area. All other files stay the same, only that file reverts itself to what it was at that <commit_id>. To undo this action just run
git checkout HEAD <file_name>.Note: If you commit the changes, that commit is added to the commit history, no commits are lost. It’s just a new snapshot. So you can always go back to a previous commit if you want to undo that.
git checkout --<file_name>
Removes all changes made to the specified file that are in Working Directory. So effectively makes that specific file be what it was at the last commit and leaves all other files alone.
8. Git Branch
NOTE: Technically branches are really just references to certain commits. A branch is NOT a container for commits. It is simply a pointer to a specific commit. So there’s no need to be afraid of deleting branches. If there’s a commit there, you can go back to it. And if you want commits to keep a reference to the branch they were created on, I would recommend adding that info to your commit messages.
git branch
Displays all local branches
git branch -r
Displays all remote branches.
git branch -a
Displays all local and remote branches
git branch -m <old_branch_name> <new_branch_name>
Rename an existing branch
git branch -d <branch_name>
Deletes <branch_name>. Only deletes if it has already been merged into master. Otherwise, git will throw an error.
git branch -D <branch_name>
Force deletes <branch_name>. Even if it has not been merged.
9. Git Fetch
When you do a git fetch or git pull it syncs/updates your local copies of your remote branches. There are 3 “master” branches at any given time when you are connected with a remote repo. There is the local master branch, the remote master branch and the local copy of the remote master branch which is called “origin/master”. So using a git difftool or just straight git diff, you can look at the differences between each.
git fetch <remote> <branch>
Usually this will be
git fetch origin mastergit fetch origin masterwill sync the local copy of the remote(origin/master) with the master branch at the remote called origin.You can omit <remote> and <branch> if you only have one remote.
Note: this does not affect any non-remote branches in any way. The local master branch is not affected either. ONLY origin/master, the local copy of the remote master branch. That’s what makes this different from a
git pull origin master.
Use Case:
If you want to compare the differences between the remote master and the local copy of remote master, without trying to pull and potentially have to deal with merge conflicts, enter the command:
git fetch
and then the command
git diff origin/master master
and you’ll see the differences.
If the changes are minor then it would probably be best to do a git pull --rebase. (Same as git pull --rebase origin master)
After a
git fetch, you would merge origin/master into master to update your local master to be the same as origin/master.Note:
git pullis essentially agit fetchand then agit merge origin/master.
10. Git Reset
git reset is an unsafe action in general. It will delete commits.
Rule of Thumb: DO NOT do this to commits that are in a remote repo that other people might be using. ONLY do this with local changes.
By default, git reset only ever affects tracked files. A file is tracked if it has ever been added to the staging area. If you need to do similar things to untracked files, look into the git clean command.
git reset
Undoes changes for all tracked files in the Index/Staging Area.
git reset <file_name>
Unstages <file_name> from Index/Staging Area
NOTE: The changes are still in your working directory, you haven’t lost your work. They are just unstaged.
git reset --hard
Removes all changes since most recent commit. Unstages AND removes them from working directory. Essentially loads the project at the most recent commit and deletes everything that came after it.
git reset --hard <commit_id>
Basically erases everything that happened after the specified commit_id.
git reset <commit_id>
Unstages all files to the specified <commit_id>. Working directory still has all of those changes.
Use Case: if you want to break the changes in that commit into multiple commits.
11. Some Other Git Stuff
git help <git_command>
This will show you info about the specified <git_command>. What it does and how to use it. Very helpful. I think that using this instead of doing a google search will make me faster at Git in general. And keeps me in the terminal rather than going to my browser, doing a search, looking for the best explanation etc. Not bad necessarily, but anything that makes me leave my terminal costs me more in terms of task/focus switching, which in turn hurts my productivity.
git commit -am “<commit_message>”
Commits files in the working directory.
Essentially combines
git add .andgit commit -m “<commit_message>”NOTE: Only works on tracked files. So if you haven’t ‘git add’ that file before, it won’t commit it.
git revert HEAD
Appends a new commit that will take the entire project/repo to the state it was before the most recent commit(like if you committed a bug and need to revert). No lost history or commits. So you can always load your changes again if you need to. They’re in the commit right before the new most recent commit.
One last note: When you clone a remote repo, by default it automatically creates a remote connection called ‘origin’, which points back to that cloned remote repo. Which is why when you clone a project you don’t have to also run a git remote set-url origin <remote_repo_url>.
Conclusion
I learned a ton going through that course and writing out this post. I hope it’s useful to you too! Git is obviously incredibly powerful. While using it I am consistently amazed and frankly grateful for what it can do.