My Software Development Setup, Pt. 2

iTerm and Command Line Setup
Useful Guides
Now to get my development environment up! Before I get started I want to mention a few resources that I found especially helpful when I was figuring out exactly what I wanted to do and how.
https://www.smashingmagazine.com/2015/07/become-command-line-power-user-oh-my-zsh-z/
https://rick.cogley.info/post/use-homebrew-zsh-instead-of-the-osx-default/
Since I installed Xcode in Part One, it came with a bunch of Command Line Tools. It comes with Apple forks/versions of things like Git and ZSH (Zshell). However, the Apple versions are usually a couple versions behind the most current version. I want the most current and direct fork of things like Git and ZSH, not incorporate them with Apple as a middleman. More on how to make your system avoid the apple versions in a minute…
1. Install Homebrew
For installing Git and ZSH, I installed Homebrew via this command
/usr/bin/ruby -e "$(curl -fsSL https://raw.githubusercontent.com/Homebrew/install/master/install)"
as described on Homebrew’s website (https://brew.sh). A quick, very basic, aside about package managers -
Homebrew Cask is for installing graphical applications (like google chrome). It’s a command line alternative to going to the company website and downloading the app. (I think it comes with Homebrew now)
Homebrew is for installing Command Line Tools like a VCS(Git), Terminal Shell(ZSH), or a different purpose package manager like Yarn/npm.
Yarn and npm both serve the same purpose. For installing dependency packages in your development projects. Npm comes with Node when you download Node, so I’ll have it either way when I do that. I chose to use Yarn because it’s a little faster and a little more secure than npm.
Useful articles — https://apple.stackexchange.com/questions/125468/what-is-the-difference-between-brew-and-brew-cask, https://www.keycdn.com/blog/npm-vs-yarn/
2. Install Zsh
You can use this guide mostly for installing zsh: https://rick.cogley.info/post/use-homebrew-zsh-instead-of-the-osx-default/.
Aside, If you look here https://github.com/robbyrussell/oh-my-zsh/wiki/Installing-ZSH, it also says to install ‘zsh-completions’. Don’t do that yet. Because you want to be able to clone/install the zsh-completions package into the .oh-my-zsh directory. So you want to install oh-my-zsh before zsh-completions.
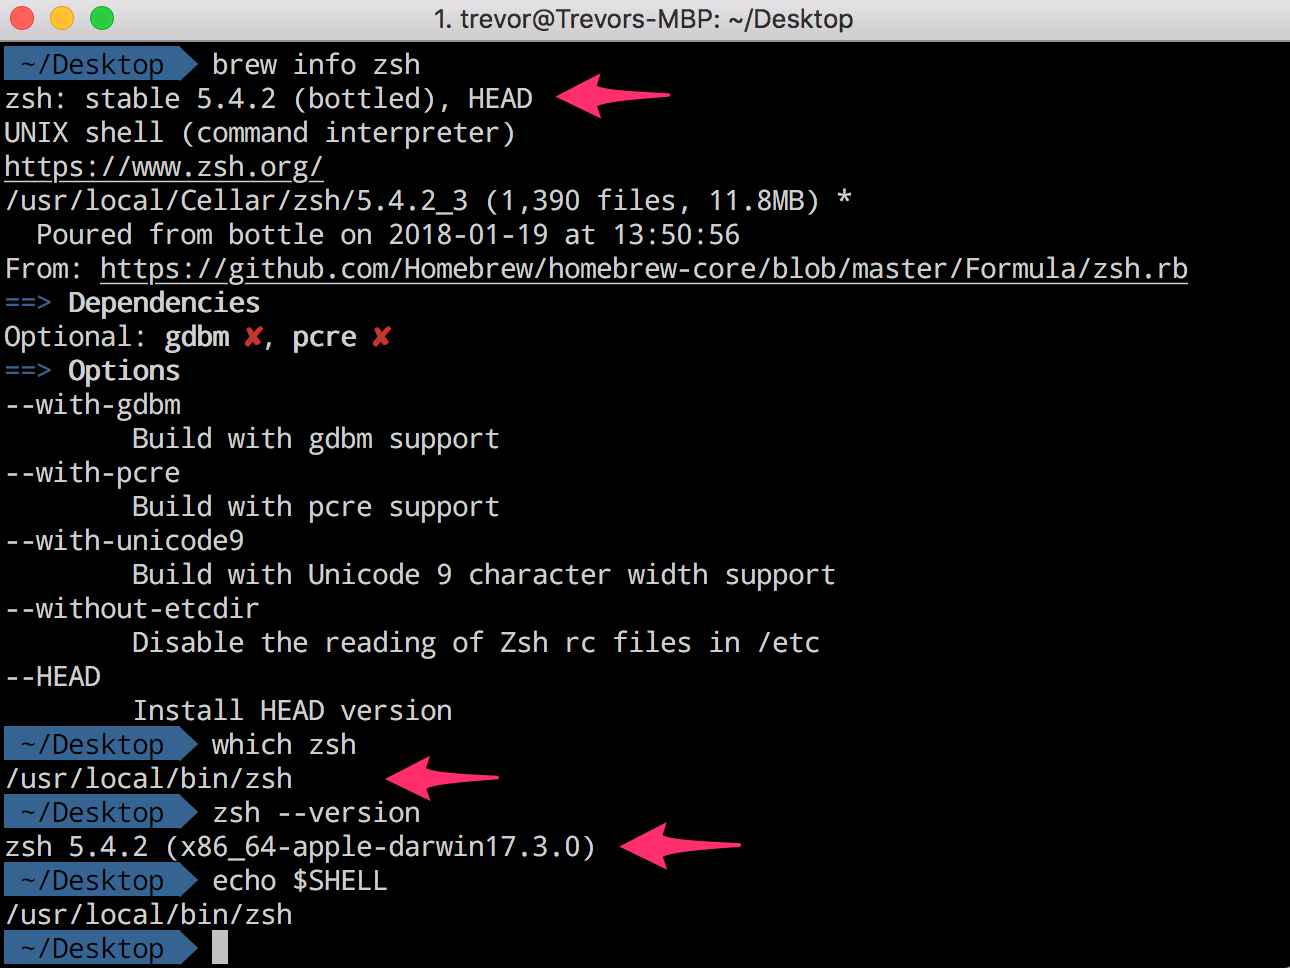
In the end, you’ll want to be able to type which zsh, right when you start up iTerm, and get back /usr/local/bin/zsh. When you type zsh --version it will still say that it’s an apple version (mine says — zsh 5.4.2 (x86_64-apple-darwin17.3.0). However, before I made all the changes, the zsh version was lower. 5.4.0 or something like that. One giveaway is when you type brew info zsh, the zsh version will be the same as the one when you type which zsh. In the brew info zsh it won’t say an apple version, but the which zsh will. That’s okay. If the numbers match up (5.4.2 for me), then you’re using the brew installed version.
ZSH is a terminal shell I like. Because ‘Oh-My-Zsh’ is awesome. I researched some alternatives (Bash, Ksh, Fish) and landed on Zsh with oh-my-zsh.
Zsh-completions is a small package that adds more tab-completions to ZSH. Not necessary, just convenient.
If, when you install zsh, it prompts you to do some setup, go ahead and go through it. If you do, it will create a .zshrc file for you. It won’t mess anything up in the future.
Once you have a ‘.zshrc’ file, put this line in it export PATH=“usr/local/bin:$PATH”. This makes it so that MacOS will first look for a home-brew version of something(Git, ZSH) and use that version, rather than the MacOS default version.
3. Install Git
A pre-req for Oh-My-Zsh is git. Not sure why, but in any case, just run the command brew install git in iTerm.
4. Install Oh-My-Zsh
Then install Oh-My-Zsh. https://github.com/robbyrussell/oh-my-zsh. It gives you two options, install with ‘curl’ or ‘wget’. I used curl
I chose to use curl mostly just because I didn’t care about the recursive quality of wget at this time. I have curl, I’ve used curl, I don’t need something different right now, so I’m not going to bother installing an alternative.
Because: https://unix.stackexchange.com/questions/47434/what-is-the-difference-between-curl-and-wget.
The first comment here goes into slightly more depth: https://news.ycombinator.com/item?id=11213213
This article goes into more depth: https://daniel.haxx.se/docs/curl-vs-wget.html).
5. Configure Oh-My-Zsh
I set the theme for zsh to “agnoster”. To open the .zshrc file, go to your home folder, which should be named your username, and press Shift-Command-Period. That command will show/hide hidden files/directories. Open the .zshrc file and modify it so that it looks like the pics below, except for line 5 and 105. On line 105, the DEFAULT_USER should be set to whatever your username is. On line 5, the path will be /Users/<Your_Username>/.oh-my-zsh.

My .zshrc file

My .zshrc file
Lines 105 and 106 are there so that my username is hidden as described here under ‘agnoster’. If you want to customize it in a different way than I did, check out the official agnoster repo here. Mostly, you just need to enter this command into iTerm so that you can see if the font you choose supports those characters.
echo “\ue0b0 \u00b1 \ue0a0 \u27a6 \u2718 \u26a1 \u2699”
6. Install zsh-completions
As described here. Just run this command
git clone https://github.com/zsh-users/zsh-completions ~/.oh-my-zsh/custom/plugins/zsh-completions
And then enable it by putting these lines in the .zshrc file. Which I have done on lines 63 and 68 in the above pics.
plugins=(… zsh-completions)
autoload -U compinit && compinit
7. Install zsh-syntax-highlighting
I downloaded and installed zsh-syntax-highlighting as described here under Syntax Highlighting. Just run this command:
brew install zsh-syntax-highlighting
and then add this line to the end of your .zshrc file:
source /usr/local/share/zsh-syntax-highlighting/zsh-syntax-highlighting.zsh
Which I’ve done on line 108 above.
8. Install powerline fonts
Now install patched power line fonts as described here. I ran these commands all at once, including comments.
# clone
git clone https://github.com/powerline/fonts.git --depth=1
# install
cd fonts
./install.sh
# clean-up a bit
cd ..
rm -rf fonts
At this point you should be able to run this command and see the appropriate symbols.
echo “\ue0b0 \u00b1 \ue0a0 \u27a6 \u2718 \u26a1 \u2699”
9. Configure iTerm
Now to configure iTerm! I’m going to run you through what I have done, but this is a good resource https://gist.github.com/kevin-smets/8568070.
Open iTerm, From the toolbar select iTerm2 -> Preferences -> Profiles -> Colors.
Under ‘Color Presets’ select Tango Dark
Increase the cursor boost to about 25% of the slider
Change the cursor color to ‘c1c1c1’.
In Profiles, switch from Colors tab to Text tab.
Click change font, select Droid Sans Mono for Powerline, 14pt
In the end it should look something like this:
